
In preparation for a big event, you’ve been putting in extra work in the gym. All you need to add now is the extra “slay” factor. Want beautiful cheekbones like Beyonce? Luscious lips like Kerry Washington?
Portland-based, professional make-up artist Alena Morris shares the tips and techniques needed to beat your face like the best of them.
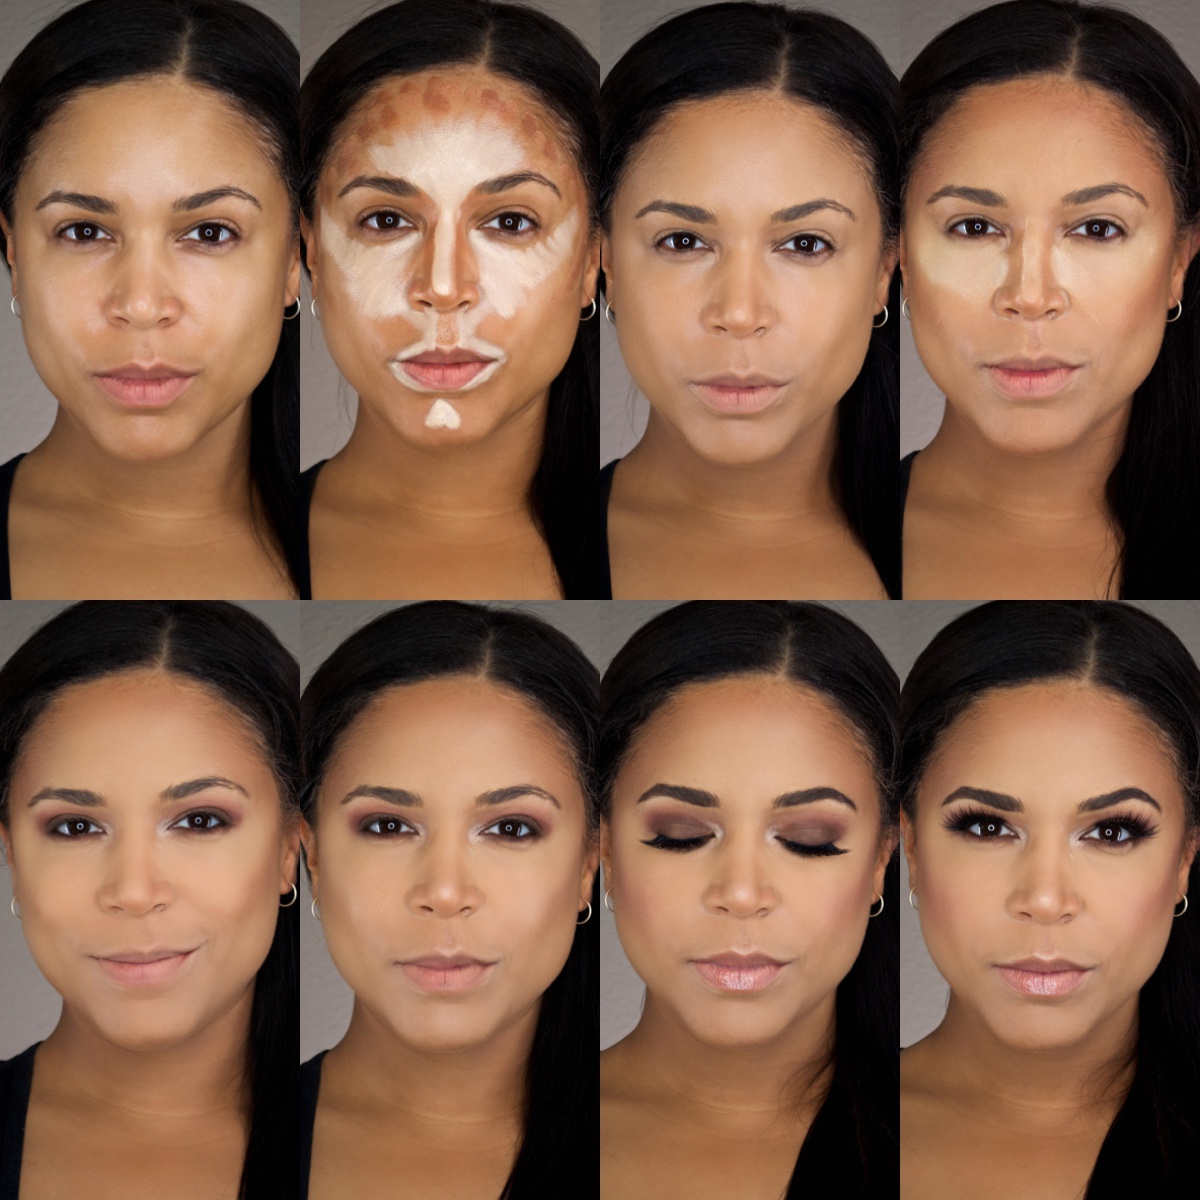
Step 1: start with a clean + moisturized face. If you have oily skin, use an oil-free moisturizer.
Step 2: highlight (using makeup 1-2 shades lighter than your natural skin tone) the features you wish to bring forward or accentuate, using cream or liquid concealers under the eye, in the cupid’s bow, along the bridge of the nose, and above the brow.
Step 3: contour (using a color 1-2 shades darker than your natural skin tone) the features you wish to draw attention away from, by creating shadows and depth along the temples of your forehead; beneath the cheekbone–starting from the hairline; alongside the bridge of your nose; underneath your nose–nostril area; underneath chin; along the jawline–blending downwards). Contour is also used to soften and/or sharpen features. For example, it can give the illusion of having cheeks when they would otherwise appear flat or nonexistent, can reduce the appearance of a double chin, and make a round face look slimmer, or a large forehead appear smaller.
Step 4: stipple your foundation over your contour/highlight using a round foundation brush (kabuki or duo fiber) or damp Beauty Blender. Blend until you cannot tell where the highlight or contour starts and stops. Your face should look as though it’s naturally light in the center of your face and deepens along your hairline; while still matching the warmer parts of your body (i.e. the upper torso/collar bone area).
Step 4: Set or “bake/cook” your highlighted and contoured areas with loose powder, either translucent (which doesn’t alter the color variation while giving your face a matte finish) or using tones complimentary to the concealers used. If you want the appearance of dewy skin (shine), simply brush the powders on. However, if you are oily and/or want a matte finish, it is important to not only pack the powder onto those designated areas but let it sit (or cook).
Step 5: while your highlight bakes, work on the eyes! Eyeshadows are known to have “fall-out” (no matter how careful you are). But by leaving the excess powder “cooking” beneath the eyes, any trickle of fallen eye shadow can be easily swept away with a brush once finished, so it won’t settle into your foundation.
Step 6: once the eyes are finished, and you’ve swept away the excess powder. Apply a bit of extra bronzer to give the contoured area more definition. Then apply blush starting from the hairline and fading out towards the apples of your cheeks. Top the cheekbone, tip of your nose, cupid’s bow and center of the forehead with a light brush of highlight.
Step 7: Finish with filling in your brows, and your preference of lipstick or gloss.
Step 8: Curl lashes, apply mascara and for added flair, use false lashes!
August is the second most popular month for weddings. Whether you’re preparing to watch a friend walk down the aisle, or planning to attend an important social gala, don’t be afraid to do a lil “extra” to add an element of sophistication to your makeup application.
Wishing you a Happy Summer,
Holly


awesome post presented by you..your writing style is fabulous and keep update with your blogs.
best beauty parlour in hyderabad for bridal makeup
best bridal makeup in hyderabad
Nice blog.Very much useful blog on beauty and tips to maintain our beauty..Keep update and share your ideas.. bridal makeup packages in hyderabad
best bridal makeup in hyderabad